Werval Manual
The Werval Manual is intended to be a comprehensive guide to the development kit version 0.7.5.
|
Caution
|
Work in progress! |
1. Introduction
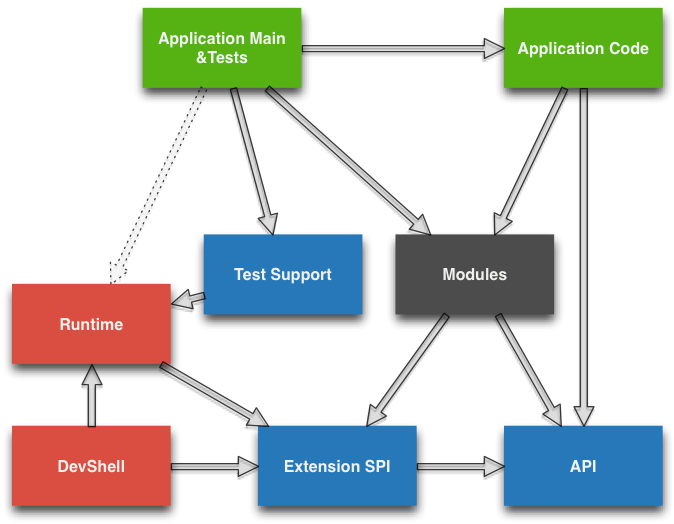
Werval is a HTTP development kit. Werval is not a full stack framework.
In other words, Werval don’t compell you to use any persistence mechanism nor templating engine. You are free to choose whatever may suit your needs.
2. Application
A Werval Application is nothing but a plain old Java program. The framework provide a default main class/method for you to reuse but you can also write yours if you need it.
In development and test modes, no configuration file is required. To run in production mode, the minimal requirement is a configuration file named application.conf containing an app.secret entry.
2.2. Modes
A Werval Application can run in three different modes:
-
Development: the HTTP stack is single-threaded, source code is watched for changes, Application is restarted on-demand and stacktraces are disclosed in responses.
-
Test: the HTTP stack is single-threaded and Application run from compiled bytecode.
-
Production: the HTTP stack is multi-threaded and Application run from compiled bytecode.
2.3. Runtime Models
A Werval Application can run according to three different runtime models:
-
Heavyweight, with HTTP Service, most used runtime model for a HTTP application.
-
Middleweight, with HTTP Context but without HTTP Service, typical runtime model for controller tests.
-
Lightweight, with no HTTP support, useful for applying the worker runtime model easily ; that is execute some application code in a lightweight process.
|
Tip
|
See the Deploy on Heroku guide for lightweight mode usage example implementing Heroku workers. |
2.4. Threading Model
Werval has a quite simple threading model based on the Netty one.
-
Netty
-
Netty Selector Threads, default to
Runtime.availableProcessors()-Netty IO Threads, default toRuntime.availableProcessors() -
Application
-
Application Execution Thread Pool
-
It means that by default, none of your controller code is executed on the IO Threads and that any controller doing blocking operations will not slow your application down.
2.5. Summary
| Development Mode | Test Mode | Production Mode | |
|---|---|---|---|
|
Heavyweight Runtime |
Typical use while coding
|
For tests that require a complete HTTP stack
|
Typical production model
|
|
Middleweight Runtime |
|
For Werval integrations tests that do not require a complete HTTP stack
|
For hackish worker process that require an HTTP context but no HTTP stack
|
|
Lightweight Runtime |
|
Typical use case for Werval integrations tests that need no HTTP support
|
Typical worker process model
|
3. Configuration
|
Note
|
Werval configuration use the HOCON format ("Human Optimized Config Object Notation"). It is parsed using Typesafe Config. |
By default, configuration is loaded from an application.conf file present at the root of your classpath. Werval runtime configuration properties default values are automatically loaded from reference.conf files from each of Werval modules. You can of course override all theses configuration properties in your application.conf file.
If you need to add configuration properties for your application you are encouraged to do so in your application.conf file.
All configuration properties are available to your controllers and filters via the Context object.
import static io.werval.api.context.CurrentContext.*;
public MyController {
  public Outcome aControllerMethod() {
    String configValue = application().config().string("your.custom.config.key");
    // Do what you have to do according to the configuration value
    return outcomes().ok("whatever").build();
  }
}
All configuration properties can be overriden by defining System Properties. This means that you can easily provide all configuration on the command line.
|
Important
|
Every system property is also present in the configuration. For example, the java.home System Property is automatically present in the configuration at the java.home key. In other words, and if you need it, keep in mind that you can use configuration properties from the command line without defining a default value in any configuration file. |
Moreover, some special System Properties allow to use an alternate config file:
-
config.resourceto load configuration from the classpath -
config.fileto load configuration from the filesystem -
config.urlto load configuration from an URL
Note that this will replace the application.conf file, not add to it. You still can leverage the inclusion mechanism of HOCON to include your application.conf file from the one you specified using one of the System Properties described above.
4. The Global object
4.1. Configuration
app.global = com.acme.WervalGlobalpackage com.acme;
public class WervalGlobal extends io.werval.api.Global
{
@Override
public void onActivate( Application application )
{
// Called on application activation
}
@Override
public void onPassivate( Application application )
{
// Called on application passivation
}
// Many other methods, see io.werval.api.Global
// ...
}4.2. Error handling
When an error happen inside the Application it is recorded.
Each recorded Error has an ID, a timestamp, the related request ID and the original exception. This is pretty useful as is to write unit/integration tests that check error handling in your Application. And of course to track down bugs when used in conjunction with SLF4J MDC.
You can override the Global::onApplicationError() method to hook into the error handling system. Errors will be recorded after this method is called. That way, if your Global object throws, it gets recorded too.
Error records are held in-memory, if you want to persist them someway, you’ll have to provide the appropriate mechanism.
By default, a maximum of 100 errors are held into memory in a first-in/first-out fashion. You can increase or decrease this number by setting the app.errors.record.max configuration property.
5. Lifecycle
5.1. Startup explained
Application startup is sequential and pretty straightfoward:
-
load configuration
-
create application thread pools
-
load the Global object
-
resolve application routes
-
activate registered plugins
-
resolve plugins routes
-
notify the Global object of application activation
-
bind HTTP server
After that, the application is ready to process requests.
5.2. Shutdown explained
Shutting your application down gracefully is as critical as running it.
While startup fail fast, shutdown fail safe. In other words, startup fail on first error while shutdown always succeed. If errors happen during shutdown they are collected and logged once shut down in a single stacktrace thanks to Java 7 suppressed exceptions.
Application shutdown is sequential and pretty straightfoward:
-
unbind HTTP server
-
notify the Global object of application passivation
-
passivate registered plugins
-
stop application thread pools
5.2.1. Graceful shutdown
When shut down is requested (Ctrl-C, kill command etc…) the runtime is put in shutting down state for a maximum amount of time defined by the werval.shutdown.timeout configuration property that default to 5 seconds. Obviously, if there are no requests to process your application will shutdown immediatly.
While shutting down, your application will continue to serve running requests till they complete. Clients using HTTP 1.1 Keep-Alive will see your application respond with a Connection header with Close value and effectively close the connection.
Moreover, your application will respond to new incoming requests with a 503 Service Unavailable status. You can set the werval.shutdown.retry-after configuration property so that a Retry-After header is added to theses responses.
If your application is running on multiple nodes behind a balancer you can lower this value to 0, yes zero, allowing your clients to reconnect immediatly to another node. Pretty useful for zero-downtime upgrades.
6. Interactions
6.1. Routes
Routes are defined by:
-
a HTTP method ;
-
a path expression ;
-
a fully qualified method name ;
-
optionaly a method parameters definition ;
-
and finaly optional modifiers.
The default Werval router allows for textual representation of routes definition.
http-method path-expression controller-fqcn.method-name[(parameters)] [modifiers]
You can also express routes definitions in code using the Routes API.
Request URI Path and QueryString are the source of Controller Parameters.
You can also handle all the routing in your Global object.
|
Note
|
URI Fragment identifier is considered useful on the client side only, hence not taken into account when routing. However, the reverse routing API allow you to append a fragment identifier to generated URIs. |
7. HTTP
7.2. Session
As Werval is stateless oriented, it provides no way to keep session state server side. Instead a simple session Cookie is used to keep state accross user requests.
|
Tip
|
If you need to keep server side state think about your database or cache system of choice. |
The Session Cookie contains a Map<String,String> and is signed using the mandatory Application Secret. Signature use the HmacSHA1 algorithm.
7.3. Query String
import static io.werval.api.context.CurrentContext.*;
public MyController {
  public Outcome aControllerMethod() {
    String singleFoo = request().queryString().singleValueOf("foo");
    // Do what you have to do according to the foo value
    return outcomes().ok("whatever").build();
  }
}
7.3.1. Multiple values
Query strings can contain multiple values for the same parameter. How this is handled is not stated in the HTTP 1.0 nor 1.1 RFCs and, by so, open to interpretation. You, and others, are free to do it the way you, or they, want. This while being conform to the HTTP protocol. See HTTP Parameter Pollution, 2009 at OWASP.
Frameworks usually handle this in their own each way. When using one framework you get used to its way of doing things ovelooking the fact that you can get powned in pretty silly ways. See the OWASP paper cited above for numerous examples.
Werval, like other frameworks, has a default behaviour. It’s a bit simple, but this is for good. No multi-value parameters is allowed. A request coming with multiple values (eg. foo=bar&foo=baz) is, by default, rejected with a 400 Bad Request status and a warning is logged.
On the other hand, and if you really need it, you can easily enable multiple values support by setting the werval.http.query-string.multi-valued to yes.
|
Tip
|
Did you take a look at the OWASP link mentioned earlier? No? Now is a good time. |
When enabled, foo=bar&foo=baz is accepted and your application code can access the values easily:
import static io.werval.api.context.CurrentContext.*;
public MyController {
  public Outcome aControllerMethod() {
    String singleFoo        = request().queryString().singleValueOf("foo"); (1)
    List<String> allFoos    = request().queryString().valuesOf("foo");      (2)
    String firstFoo         = request().queryString().firstValueOf("foo");  (3)
    String lastFoo          = request().queryString().lastValueOf("foo");   (4)
    // Do what you have to do according to the foo values
    return outcomes().ok("whatever").build();
  }
}-
Get a single value, throws if there are multiple values
-
Get all values
-
Get first value
-
Get last value
The QueryString API leave you in control regarding which value you want to use.
|
Note
|
Enabling werval.http.query-string.multi-valued do not enable any syntax. A request with multiple foo[] values will pass but the values will be in the "foo[]" parameter, not "foo". Be careful, there’s no magic. Speaking of which, something along the line of Ruby on Rails Hash and Array Parameters could be implemented as a library, pull-requests are welcome! |
8. Plugins
Werval Plugins are bound to the Application lifecycle and provide an API to the Application code. In other words, Plugins are activated/passivated alongside the Application and they provide a facade you can use in your controllers/filters.
|
Tip
|
To use a plugin in your Application it is enough for it to be on the classpath and declared in your configuration. |
Writing a plugin is as easy as implementing io.werval.api.Plugin. As an example is worth a thousand words, we’ll go through the process of writing a Hello World Plugin.
Our HelloWorldPlugin will expose a HelloWorld API to the Application code;
public class HelloWorld
{
    public String sayHello( String name )
    {
        return String.format( "Hello %s!", name );
    }
}
and by so be declared that way;
public class HelloWorldPlugin implements io.werval.api.Plugin<HelloWorld>
{
    private final HelloWorld api = new HelloWorld();

    @Override
    public Class<HelloWorld> apiType()
    {
        return HelloWorld.class;
    }

    @Override
    public HelloWorld api()
    {
        return api;
    }
}
Now, you need to register the Plugin into your Application in its configuration:
app.plugins.enabled += fqcn.of.HelloWorldPluginEt voilà! Finaly, here is how to use the Plugin from your Application code:
HelloWorld helloWorld = application().plugin( HelloWorld.class );
String greeting = helloWorld.sayHello( "World" );
// Do something clever with greeting
To go further, the Plugin interface declare two lifecycle methods:
-
onActivation( Application application ); -
onPassivation( Application application );
Theses two are NOOP defender methods in the Plugin interface used above. Override theses to hook your Plugin in the Application lifecycle.
9. Core Library
The io.werval.api jar contains core controllers and filters.
9.1. Controllers
Core library controllers can be declared in routes by their class simple name, no need to use fully qualified class names. In other words you can use Default instead of io.werval.controllers.Default.
10. Testing
The io.werval.test module provide JUnit based construct to ease tests implementation.
First construct is Werval[Http]Test that should be subclassed by your test classes. Second one is Werval[Http]Rule, a JUnit Rule to be declared in your test classes. Both have the same extension points, choose the one that suits your needs and habits.
Using the JUnit Rules is the prefered way of writing Werval tests as they don’t force you to extend from any base class.
10.1. Werval[Http]Test usage
import org.junit.Test;
import io.werval.test.Werval[Http]Test;

public class MyTest extends Werval[Http]Test {
  @Test
  public void myTest() {
    // Assert what you have to here
  }
}
Your Application will be activated/passivated around each test method.
10.2. WervalRule usage
import org.junit.Rule;
import org.junit.Test;
import io.werval.test.Werval[Http]Test;

public class MyTest {
  @Rule public Werval[Http]Rule werval = new Werval[Http]Rule();
  @Test
  public void myTest() {
    // Assert what you have to here
  }
}
As expected, this will activate/passivate your Application around each test method.
If you prefer to have your Application activated/passivated around each test class, use the JUnit @ClassRule annotation.
import org.junit.ClassRule;
import org.junit.Test;
import io.werval.test.Werval[Http]Test;

public class MyTest {
  @ClassRule public static final Werval[Http]Rule WERVAL = new Werval[Http]Rule();
  @Test
  public void myTest() {
    // Assert what you have to here
  }
}
10.3. In practice
-
HTTP or not HTTP
-
Lifecycle around test methods, classes or suites
-
Logging (Slf4jRule, Logback)
-
Configuration (choose config file)
-
Routes (inline or choose config file)
10.4. Testing HTTP
|
Tip
|
The Werval Team recommend rest-assured. Werval JUnit Support has transparent integration with rest-assured if it is detected on the tests classpath. rest-assured base URL is then set accordingly to the Werval configuration so you can use relative paths when using it. All HTTP assertions in the SDK are done using |
10.5. Testing browser based UIs
|
Tip
|
The Werval Team recommend FluentLenium. All browser based UI assertions in the samples are done using |
11. Development Mode
Class reloading is implemented using [ClassWorlds](https://github.com/sonatype/plexus-classworlds).
Here is an overview of the development mode classloader hierarchy;
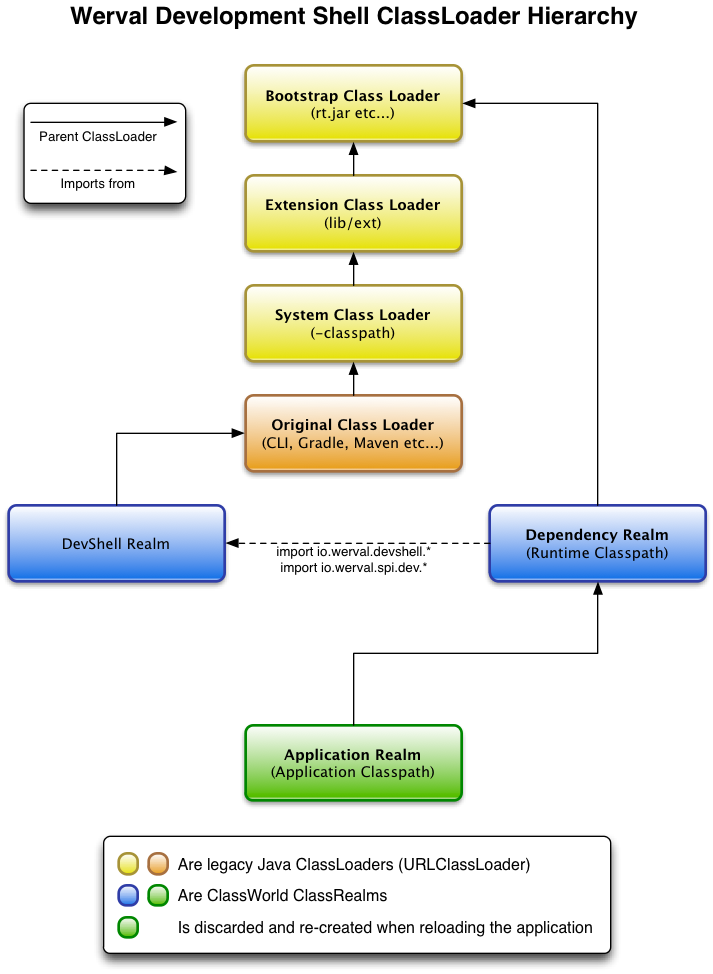
The Application Realm is the classloader that gets reloaded on source code change.
12. UNSORTED
12.1. Logging
Werval use the SLF4J API (Simple Logging Facade for Java) but you have to choose what SLF4J implementation to use. We strongly recommend Logback. You have full control on logging configuration.
All Werval loggers are present in the io.werval namespace according to code packages.
|
Tip
|
Werval Runtime leverage SLF4J Mapped Diagnosic Context, aka. MDC, by putting the current request ID at the X-Werval-Request-ID key. Moreover, you can enable the werval.http.log.context.client_ip configuration property to add the current request client IP address at the X-Werval-Client-IP key. You can use theses keys in your loggers output patterns. |
12.2. Character encoding
By default all character encoding is done in UTF-8. Character encoding can be changed by setting the werval.character-encoding configuration property.
Werval ignore the runtime platform default encoding and complies to its configuration only. This is the only way to get a consistent behaviour accross different environments and prevent mojibakes.
|
Caution
|
Even tough Werval does its best to ensure uniform character encoding for your application, you may use libraries that don’t. In such a case you should set the default Java character encoding using the file.encoding system property. |
All Werval APIs allows you to override character encoding when relevant.