JDBC Module
The JDBC module provide a JDBCPlugin that brings easy database connectivity and solid connection pooling thanks to HikariCP.
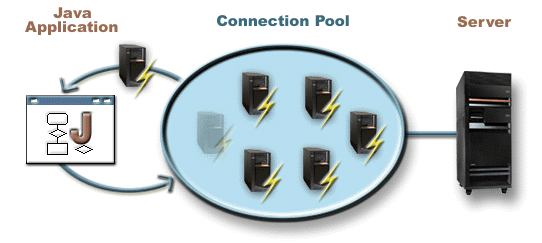
In software engineering, a connection pool is a cache of database connections maintained so that the connections can be reused when future requests to the database are required. Connection pools are used to enhance the performance of executing commands on a database. Opening and maintaining a database connection for each user, especially requests made to a dynamic database-driven website application, is costly and wastes resources. In connection pooling, after a connection is created, it is placed in the pool and it is used over again so that a new connection does not have to be established.
https://en.wikipedia.org/wiki/Connection_pool

Declaration
In order to use the JDBCPlugin you must add a dependency to io.werval.modules.jdbc and register the plugin in your configuration.
When using Gradle:
compile 'io.werval:io.werval.modules.jdbc:{werval-version}'When using Maven:
<dependency>
    <groupId>io.werval</groupId>
    <artifactId>io.werval.modules.jdbc</artifactId>
    <version>{werval-version}</version>
</dependency>
And finally your application configuration:
app.plugins.enabled += jdbcConfiguration
Multiple DataSources can be configured in your application.conf. One of them is the default one. This is the one named default.
So, to use a single DataSource you simply configure the default one:
jdbc {
    datasource.default {
        driver = "fully.qualified.classname.of.your.database.Driver"
        url = "your-db-jdbc-url"
        username = "your-db-username"
        password = "your-db-password"
    }
}
The default DataSource name can be changed by setting the jdbc.default_datasource configuration property.
Here is a configuration snippet that sets up two DataSources (first_ds & second_ds) and change the default one’s name:
jdbc {
    default_datasource = first_ds
    datasources.first_ds {
        driver = "fully.qualified.classname.of.your.database.Driver"
        url = "first-db-jdbc-url"
        username = "first-db-username"
        password = "first-db-password"
    }
    datasources.second_ds {
        driver = "fully.qualified.classname.of.your.database.Driver"
        url = "second-db-jdbc-url"
        username = "second-db-username"
        password = "second-db-password"
    }
}
Connection Pooling
The Hikari connection pool can be tuned for each configured DataSource directly from your application configuration.
Here is the list of supported configuration properties and their type:
jdbc {
    datasources.first_ds {
        # ...
        autocommit = yes/no
        isolation = string (one of TRANSACTION_NONE, TRANSACTION_READ_COMMITTED, TRANSACTION_READ_UNCOMMITTED, TRANSACTION_REPEATABLE_READ or TRANSACTION_SERIALIZABLE)
        readOnly = yes/no
        catalog = string
        minimumIdle = integer
        maximumPoolSize = integer
        connectionTimeout = duration (eg '2 minutes')
        idleTimeout = duration
        maxLifetime = duration
        initializationFailFast = yes/no
        leakDetectionThreshold = duration
        connectionInitSql = string
        connectionTestQuery = string
        registerMbeans = yes/no
        isolateInternalQueries = yes/no
    }
}
See the HikariCP documentation for the details of each one of theses properties and their default values.
JNDI
If you need to expose your DataSource in JNDI, simply add the desired jndiName to its configuration:
jdbc {
    datasources.first_ds {
        # ...
        jndiName = MyDataSource
    }
}
It will automatically use the JNDI module running an embedded JNDI service and register the DataSource with the configured name.
|
Tip
|
JPA & JNDI
This is needed for JPA, see the JPA module documentation. |
Logging
The Hikari connection pool will log to SLF4J.
If you need precise JDBC & SQL logging, you can enable the log4jdbc integration per DataSource in your configuration:
jdbc {
    datasources.second_ds {
        # ...
        log4jdbc = yes
    }
}
log4jdbc will log using SLF4J to the jdbc.sqlonly, jdbc.sqltiming, jdbc.audit, jdbc.resultset, jdbc.resultsettable and jdbc.connection loggers.
|
Tip
|
log4jdbc configuration
This documentation do not cover For convenience the
application.conf
|
Usage
Here is how to get a Connection to the default DataSource:
Unresolved directive in <stdin> - include::src/test/java/io/werval/modules/jdbc/DocumentationSupport.java[lines=18..21,indent=0]

Unresolved directive in <stdin> - include::src/test/java/io/werval/modules/jdbc/DocumentationSupport.java[lines=25..37,indent=0]
To use a specific DataSource, use the other methods available in the JDBC class, here is a sample using the second_ds DataSource:
Unresolved directive in <stdin> - include::src/test/java/io/werval/modules/jdbc/DocumentationSupport.java[lines=42..45,indent=0]